While I don’t ever suggest anyone without a cosmetology license color their hair at home, if you are looking to do it, you might as well know the proper way how.
Before I give you my professional insider’s hair coloring lesson there are a few things you will want to keep in mind.

Don’t
Don’t try to color your own hair if you are wanting to go lighter. Bleach is messy and if handled improperly you can fry your hair off.
Don’t attempt to highlight, bayalage or ombre your own hair at home.
Don’t try to do anything too drastic on your own. It is best to leave big dye jobs to the professionals. If you have dark hair you aren’t going to get platinum on your own.
Don’t color your hair if you just permed or had it relaxed.
Don’t color your hair over any nice rug, towel or clothing.
Do
Do stay within a few shades of your natural color to ensure the color you pick is right for you. If you do something too drastic and have to go into the salon to have them fix it they will charge you a corrective color charge and it won’t be cheap.
Do gather all of your supplies BEFORE you start your dye job! Being prepared and having proper tools is going to help you have a smooth process from start to end.
Do put fashion colors over pre-lightened hair.
Use demi-permanent color if you want a short term color and use permanent if you want a long term color change.
Contents
Step 1 – Gather Supplies
Before you begin the actual process you are going to want to gather the following supplies:
- Disposable gloves
- Small whisk
- Coloring bowl
- Cape
- Coloring brush
- Silicone Spot Splash Mat
- Hair Sectioning Clips
- Stain Removing Pads
- Hair Color
- Shower Cap
A few things to keep in mind
Gloves: If you plan on coloring your hair often, you can look into reusable gloves if you don’t want to use disposable ones. They can save you space since they don’t have to sit in a box, and they tend to fit a bit more snug, which can help in your application process.
Whisk: You don’t have to have a small whisk, but it helps accurately mix the color and developer, and it is one of the professional’s best-kept secrets. It’s like baking; you don’t just use a spoon to mix the ingredients; you use a whisk or blender to make multiple substances become one.
Coloring Bowl: You can use an old Tupperware bowl instead of a coloring bowl if you have extras lying around. Just remember, once you use it as a coloring bowl, you should never use it to eat out of or store any food. This one should be common sense, but…
Robe: You can get whatever type of cape you want, but I linked a robe cape on purpose. Robe capes are great for people who color their own hair because it allows your arms to move freely without restriction and still keeps them covered. If you don’t want to purchase a cape, wear old clothes you don’t mind getting dirty. If you are messy, make sure it is a long-sleeve option.
Coloring Brushes: There are different types of coloring brushes, and they come in different sizes. The one I have linked has a skinny end, which is excellent to use to separate small sections of hair as you work your way around your head; I will get more into this later.
It is also helpful to use after the color is on to lift up your roots to get air flowing so the color processes correctly.
Silicone Spot Splash Mat: This one is super important, and I don’t suggest skipping it. No matter how clean you are, accidents, splashes, spills, and drops happen, even to professionals like myself.
If you have kids or dogs running around, your chances for spills and splatters dramatically increases.
You can lay down old blankets or towels, but those are going to be permanently ruined, and color can soak through them staining your floor underneath. Even if you have a nonporous floor like tile, lament, or cement hair color can soak through and ruin it.
Additionally, be careful of the countertop you are using to set your bowl onto; it is smart to put some type of towel or even a piece of aluminum foil underneath your color bowl, I have ruined many countertops from being messy.
Even if you wipe spilled hair color off of the counter, it will most likely still stain unless you are dying your hair a super light color.
Hair Sectioning Clips: Hair sectioning clips will help keep your hair organized before, during, and after the coloring process. The ones I have linked are the ones all professionals use, and they won’t slip even if they get wet or hair color gets on them. If you need to section your hair after you have applied the color, they will still be able to clip off any necessary piece and won’t slide.
Stain Removing Pads: These are key for touching up your scalp and any other hair color that you may get on your skin. They can be used right after application and again after you have washed your hair color out around your part and hairline.
Hair Color: Yes, you can simply go to the store and buy yourself a box kit but I don’t suggest this in the slightest. Odds are you either know a hairdresser or you know someone who knows someone. Don’t be shy and ask them if they can grab you some color and the developer you will need to color your hair from the beauty supply store.
If you have a close relationship with your hairdresser and they are their own boss who doesn’t work for anyone, odds are you can explain to them why you are looking to color your hair at home (time, convenience, trying to save money) and they might be willing to help you out with getting supplies.
I would rather give my loyal clients the supplies to do their hair at home vs. doing a box dye and then coming into me to fix it.
If you absolutely know no one who you can ask, I highly recommend you go to a public beauty supply store like Salley Beauty or take advantage of online sellers who can mail you a higher quality hair color.
Shower Cap: a shower cap is going to be beneficial in keeping the color on your hair moist. If you want to use a plastic bag you can do that too. Just time it to the nape of your neck with a hair tie.
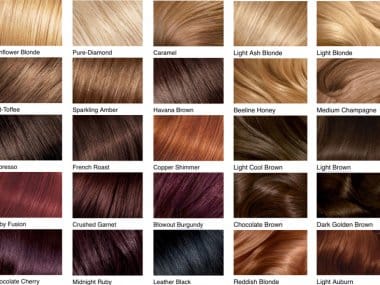
Step 2 – Pick Your Shade
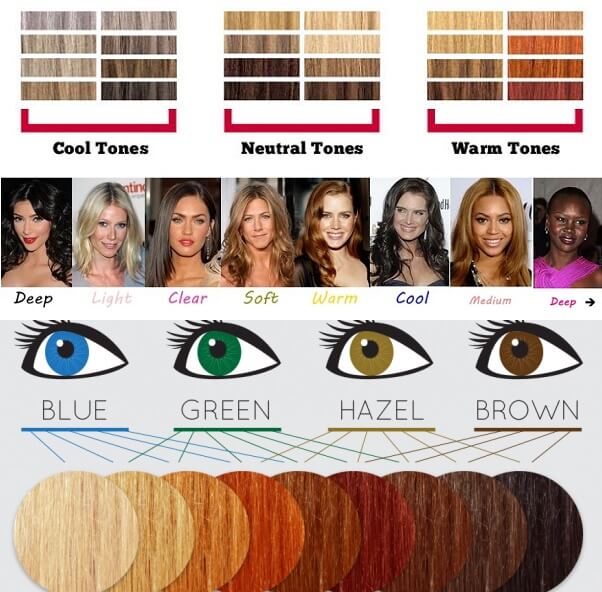
Picking out a color is more than choosing black, brown, red, blonde, silver or a fashion color. Within each color is a hue: warm, cool or neutral.
Before you pick out a hair color you will want to think about things such as skin tone, eye color, and your natural hair color.
Picking a color you want is just as important as picking out a color that will be flattering on you. If you are using a celebrity as an inspiration try to pick one that is your twin, not someone who is the opposite. If you have blonde hair and blue eyes it won’t be best to use someone with dark hair and brown eyes.
Not sure what tones you have in your skin, here’s a cheat sheet:
- Blue or purple veins = cool tones (skin will pink and olive undertones)
- Green veins = warm tones (skin will have yellow and gold undertones)
- Combination of vein colors or skin tones means you have neutral tones
You should pick a hair tone that is opposite from your skin tone – warm undertones should do cool hair colors and cool undertones should do warm hair colors.
Stylist Suggestions
- Super light white skin – try a cool blonde, silver, ash, beige
- Fair skin with cool undertones – try a warm blonde, gold, honey, dark mocha, brown black
- Pale skin with red undertones – try true red, ruby or burgundy
- Fair and neutral skin tones – try warm or strawberry blonde/red
- Warm skin tones – try cool tones of brown, mocha, dark chestnut, and chocolate
- Medium skin tones with yellow and green tones – try caramel, honey, golden brown, amber, mahogany, honey
- Warm or neutral skin tone – try cool black, espresso, blue black
- Olive to deep skin – try vibrant fashion colors
- Light to olive skin – try pastel fashion colors
Step 3 – Section Your Hair
There are many ways you can section your hair but the standard 4 grid section is my personal favorite. It is simple, easy and effective.
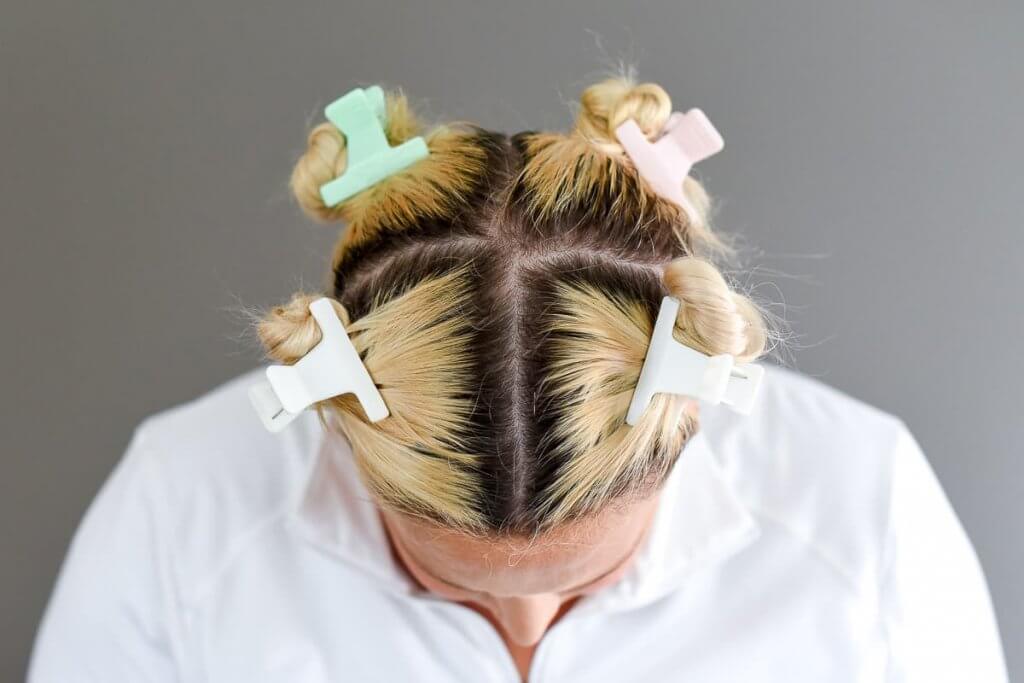
Start by making a middle part from your forehead all the way to the nape of your neck, as if you were doing pigtails. Next, work from the top of your head by the crown and do two nice clean lines creating two front sections: the lines should go down and end right behind the ear.

Now that your hair is sectioned you can put your cape on, and lay down your silicone plastic splash mat.
Step 4 – Mix Your Hair Color
Mixing your color is going to be the last step you want to do right before you are ready to apply it.
Once hair color is mixed in the bowl, it starts to oxidize, which means you don’t want to mix it, let it sit and then wait to apply it. Once your hair color has fully oxidized in the bowl it isn’t going to work the best trying to penetrate your hair…think of it like an expiration date.
Your color will look best if you can saturate your entire head right away so the color can penetrate into your hair shaft and start to change the color right away.
Following the mixing directions according to the box because each brand will have its own specific ratio. Some might be 1:1 which is 1 part color to one part developer or some might be 2:1 which is 2 parts developer to 1 part color.
Step 5 – Apply Hair Color
Start with the two front sections, work from the top to the bottom on each section (roots to end). Do the left than the right or vice versa. Don’t go back and forth between sections, pick one and finish it fully.
Start at the roots and apply the color down to the ends making sure you fully saturate the entire hair strand.
Work in 1/2 inch horizontal sections or less; any bigger will be too much hair at a time, and you will have a hard time applying the color accurately.
Bigger sections mean more hair to have to color, and you will most likely end up with dry spots that don’t get colored, leaving a spotty look. Use the skinny end of the brush to pick up the new horizontal sections as you work your way down.
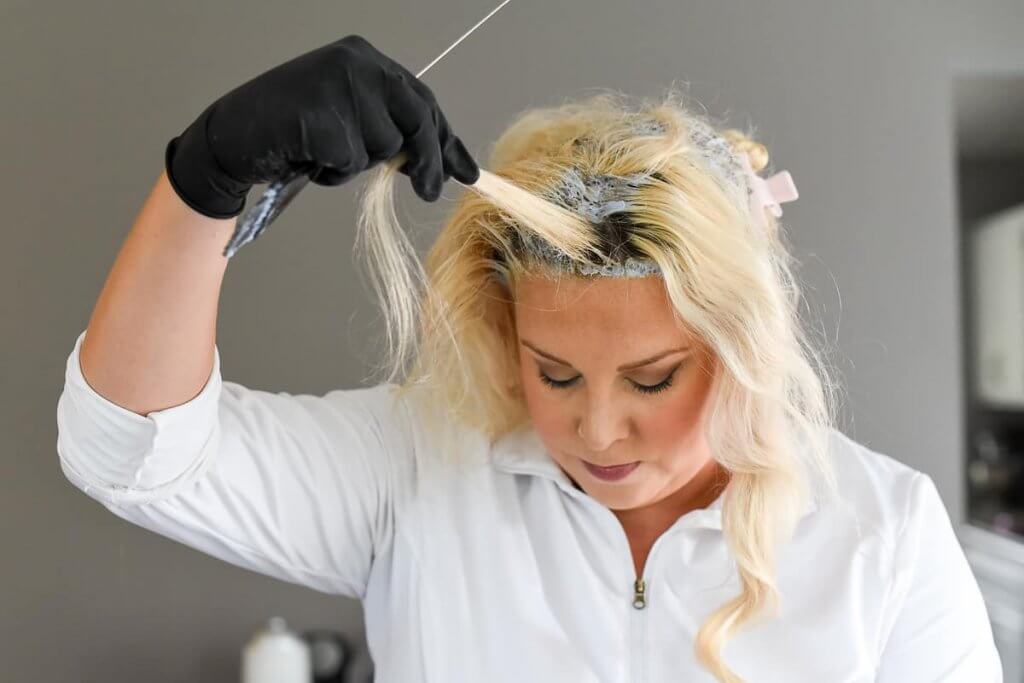
Paint the color on: Use the brush to do the top of the roots, flip the hair the other way and apply color to the bottom of the section of the roots. Picture the top and bottom of the section as the two pieces of bread, the middle being the hair strand like a sandwich, with your hair being the insides. As you can see in the section above, the piece being held up is what you will flip back and forth to fully saturate the roots.
Use the brush to apply the color a few more inches down, set the brush back in the bowl and then use your gloves to run the rest of the color fully down to the ends.
You don’t need to use the brush all the way down, that will simply waste product and time. Hair color glides easily down the hair which will feel smooth and glide with ease.
Once the hair is fully saturated from tip to end flip it over to the other side so it is out of the way and you can grab a fresh new 1/2 section to color. When you are done with the 2 big sections from the front left and right then move on to the back sections, repeating these steps fully until all the hair is colored.
Step 6 – Touch Up Spots
In my experience, it is better to use your extra product than rinse or throw it away. Once your hair is fully covered, go back to the first section and use your leftover color to quickly reapply to any spots you may have missed or touch up dry spots. Even if you don’t think you have any, it doesn’t hurt to add the rest of the product.
Any dry spots won’t be colored as well as supersaturated ones.
Step 7 – Bag Your Head

Nope, not kidding. Once you have your touch-ups done, take the skinny end of your brush and re puff up the roots so that air can fully reach all the different sections. Gather your hair in a light pile and put a plastic grocery bag over your head. If you have a shower cap this will work too.
You want your hair to be gathered in the bag without being smashed down to your head becuase airflow aids in the scientific end of the hair coloring process.
Putting a bag or shower cap over your hair will help keep heat in and will prevent your color from drying out. People with super dry and porous hair are going to want to do this step, or your hair with the color can dry and not make it through the full processing time, which brings us to the next step.
Step 8 – Wait For The Full Processing Time
Each brand will have its own processing time and it should be followed accordingly. Not waiting long enough can produce poor results and waiting too long can damage your hair.
While you might think you are on top of it I still suggest you set a timer. Set it once you have your hair in the bag and don’t set it before!
Step 9 – Enjoy Your Fresh Color
Once the timer goes off, rinse your hair and that’s it! You have successfully colored your hair at home for the first time! You should always do two shampoos and one conditioner. The first shampoo cleans your hair and the second one works as your shampoo was intended to.
I suggest using older towels after the first few washes. Depending on what color you are using the dye might bleed off your hair onto the towel, which typically stains it permanently.
Make sure you also rinse your shower down after or you might notice some color spots in the shower/bath. These will typically wash off over time unless you have a super white cloth or curtain.
If you are a gym-goer who sweats, you might have some runoff from the nape of your neck onto your shirt if you don’t rinse your hair well enough the first time.
Final Tips
If you want to color your hair and keep it as healthy as possible I suggest you incorporate the Olaplex system. It will help during and after the coloring process and from someone who is a professional, it is one thing I suggest to everyone and anyone.
You will want to invest in a proper color saving shampoo and conditioner combo to keep your color at its peak for a long period of time. Color shampoo and conditioner sets will also help put protein back into the hair that may have been compromised during the color process.